Search

Storage for Math Manipulatives

Easy and inexpensive way to organize math manipulatives
I love math manipulatives!  What Primary teacher doesn't!?!  I especially love using mini erasers or seasonal goodies as math manipulatives.  However, organization and storage really becomes an issue when you are scouring and shopping the Target Dollar Spot every chance you get.

I was at the Dollar Tree the other day buying wrapping paper for some upcoming birthday parties, (Side note: They have the best wrapping paper.  Super cute and way cheaper than anywhere else!) when I stumbled across these plastic organizers.
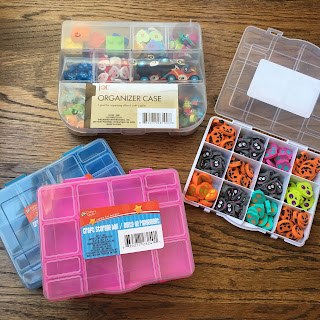
Found these plastic storage organizers at the Dollar Tree.  Cheap way to organize and store math manipulatives!
I found multiple colors and sizes.  
Found these plastic storage organizers at the Dollar Tree.  Cheap way to organize and store math manipulatives!
I knew immediately they would be perfect for storing math manipulatives and game board pieces.  
Found these plastic storage organizers at the Dollar Tree.  Cheap way to organize and store math manipulatives!
Just for reference... the larger container is about 7.5" wide by 6.5 tall.
The smaller container is 6.5" wide by 5" tall.  
Found these plastic storage organizers at the Dollar Tree.  Cheap way to organize and store math manipulatives!
The small container easily fit 180 mini erasers.  (Pumpkins, Black Cats, and Spooky Aliens)
These would be perfect to use in math stations, small groups, tutoring, or for independent work.  
Check out my Halloween/Fall Addition & Subtraction FREEBIES.  
Math manipulatives: Use seasonal erasers for addition and subtraction math practice
This FREEBIE includes printables to help students practice addition and subtraction during September & October. Ten Frames & Part Part Whole are great strategies for ensuring students have a conceptual understanding of basic math facts.
Addition and subtraction practice using part part whole
Use seasonal mini erasers as math manipulatives.  Perfect for practicing addition and subtraction on a ten frame
Happy Fall, Y'all!

Box Tops Box!

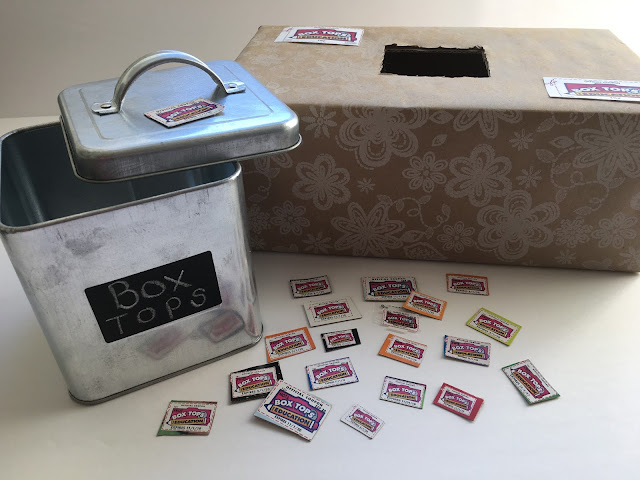
Found this galvanized metal canister in the Target Dollar Spot!  Perfect for collecting Box Tops for Education!
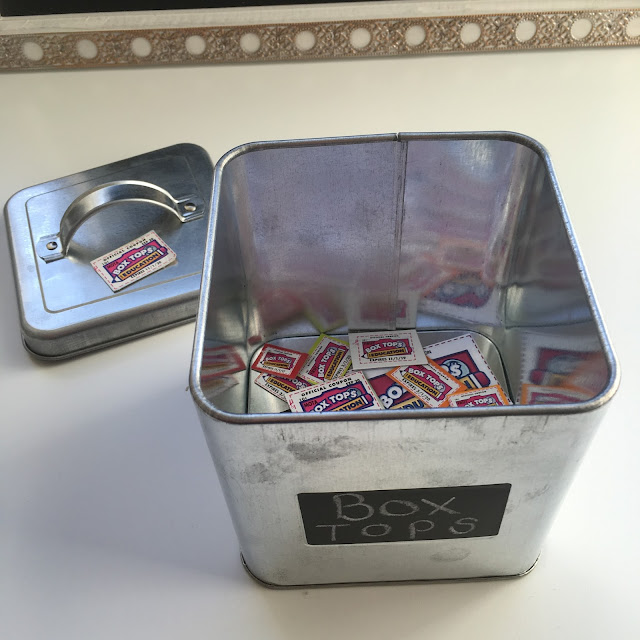
As soon as I stumbled upon this galvanized canister in the Dollar Spot at Target, I knew I had to have it!  Right away I thought, "PERFECT for BOX TOPS!"  
Love this cute little canister for collecting Box Tops!
It's about the size of a Kleenex box... so it's big enough to hold hundreds of Box Tops but small enough to not take up much space in your classroom.  To collect Box Tops in the school library or front office, just use a shoe box!  Cover it with cute wrapping paper.  Use an X-Acto knife to cut a hole in the middle of the wrapped box.
Great idea for collecting Box Tops... Use a cute little canister in your classroom & a large shoe box with a hole cut in the middle for the front office
My X-Acto cutting skills were awful today, so I disguised my crooked cutting with some washi tape around the edges of the hole.  So cute & easy!
Cover a large shoe box with cute wrapping paper.  Use an X-Acto knife to cut a hole in the middle of the box.  Put washi tape around the edges of the hole to add some extra cuteness.  Now you are ready to collect Box Tops in your classroom
I love the idea of sending home a Ziploc baggie with a note that reminds parents to save their Box Tops and send them to school. 
Michelle from Michelle's Charm World suggests printing your note on an Avery label and sticking it on each baggie.  LOVE IT!
Samantha from Simply Organized clips her baggie to the side of her fridge.  So easy to just slip the Box Tops inside the open baggie after you cut them out.  
Love this metal canister from the Target Dollar Spot for collecting Box Tops
Get yourself to Target ASAP!  ;) 

Magic Reading Fingers

During reading groups, have students track print using magic reading fingers.
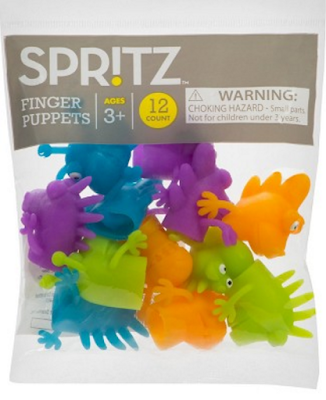
Tracking print is an important part of learning to read.  It helps children keep their place in the text and helps build fluency.  It's a core print concept in Kindergarten and 1st grade.  By second grade, students are usually able to track text with their eyes.  Your Kindergarten and Firsties can simply track print with their fingers, but I think it is a lot more fun to give them a special tool!  I found these finger puppets in the party section at Target.
Use finger puppets as magic reading fingers during guided reading groups.
 Couldn't believe they were only $2 for a pack of 12!  Get in my cart!
Use finger puppets to help students learn to track print during guided reading groups.
We don't just use these special tools to track print, I use "magic pointers" for various activities in my guided reading groups and even during whole group instruction.  Here are a few ideas...
-Find letters, sight words, spelling words, or vocabulary words on the page you are reading.
-Have students identify specifics in the text...  "Point to the main character..." "Show me a picture that shows the main character is upset."
-Identify parts of the book.  "Point to the title."  "Show me the spine of the book."  "Point to the illustrator's name."
-Use magic reading fingers for rereading text.
-Model how to track print using your very own magic reading finger.  Students will love watching the monster dance along the page.
-Oriental Trading has some fun things that you could use for reading fingers as well.  I love these spooky Martian Fingers & Arrows!


Looking for a deal at Oriental Trading? Visit their coupon page for the latest in sales.

My Oriental Trading Classroom Wish List

As a teacher, there is always "stuff" you need for your classroom.  Teachers spend so much of their own money on classroom decorations, supplies, manipulatives, games, stickers, and prizes for their students.  We spend our own money because we want to, but it's always nice when parents help out by donating goodies!
As a parent, I like to give my boys' teachers small gifts throughout the year.  I like to surprise them on a random Monday or at the end of a long week with a little treat.  The problem is I never know what to give them besides a gift card or some caffeine & chocolate.  Now that I'm a parent, I appreciate Teacher Wish Lists more than ever before.
Traditionally, I've created a "Giving Tree" like this to ask for donations.  
Set up a giving tree at Open House so parents can donate supplies to your classroom.
I would set up my giving tree for Back to School night or during Parent Teacher Conferences.  It's so cute but the problem is it's short lived.  An online teacher wish list, like Oriental Trading's, is ideal because you can make updates, add items, or delete things that you end up purchasing yourself.  Oriental Trading has everything teachers need: bulletin board materials, pocket charts, storage containers, bulk school supplies, treasure boxes & prizes, classroom and holiday decor, stickers, games and learning toys, math manipulatives, puzzles, puppets, art supplies, and so much more!  I've been shopping with Oriental Trading for years, but I didn't realize the assortment of teacher goodies they stocked.
 A few of the items on my Oriental Trading Wish List.  
I like that I can put inexpensive items, as well as BIG TICKET items on my list.  Hey, you never know!  Maybe a parent will buy one of the pricier items as a Christmas or Teacher Appreciation gift.
I'm loving this clipboard storage system.
I've always wanted to do a question of the day during Calendar Time/Morning Meeting.  This graphing pocket chart would make it so easy, and so much math talk would go down!
Food for Thought... How do you let parents know you have an online wish list without seeming greedy!?!?  Here are a few ideas...
1.  Mention it to parents in your monthly classroom newsletter. Don't forget the link!
2.  Post it on your school website or classroom blog.
3. Send home a sweet little flyer in students' take-home folder.
Teacher Wish List: Create an online classroom wish list so parents can donate supplies that you really want and need for your classroom!
Download this FREE editable template here.
I'm so excited about my own Oriental Trading Wish List, and I can't wait to tell my kids' new teachers all about how they can create their own classroom wish lists!

Disclosure: TheHappyTeacher & Oriental Trading partnered for the purpose of this post. I received free samples of Oriental Trading products, but all opinions are my own and 100% honest.

Back to School Photo Booth


Use an extra bulletin board to create a PHOTO BOOTH for Back to School pictures

Back to School and 1st Day of School photos are all the rage.  Facebook, Instagram, & Pinterest are flooded with adorable ideas for photo booths, giant picture frames, and chalkboard pics.  I love them all, but they seem so complicated.  My sweet friend Mary Beth and I created a super easy & functional photo booth in less than 20 minutes.  
First, we covered an extra bulletin board with some super cool paper, Ella Bella Photography Backdrop Paper®.  I love the rustic, vintage wood look! 
Using a bulletin board as a photo backdrop
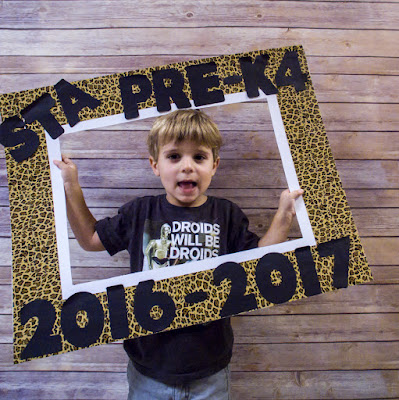
Cute already, right?  I used an X-Acto knife to cut a rectangle from a heavy duty poster board.  I covered the poster board in duct tape and then glued the letters on.  
This was the easiest photo frame to make.  Use an X-Acto knife to cut a rectangle out of a poster board.  Line the poster board with cute duct tape.  Glue on pre-cut letters and VOILA!  Super cute Back to School/ 1st day of school pictures!
Use this photo booth to take pictures of your students during the first week of school.  I also love the idea of having a photo booth set up in a common area at school to use during Meet the Teacher night/Open House.  Kiddos can take pictures with their parents, friends, and teacher.  Now that everyone has a camera on their smart phone, it will be easy & fast to get some adorable Back to School photos.  
Use a bulletin board in a common area as a photo booth for Back to School pictures.
Our "photo booth" bulletin board is in a common area at school (see picture above).  After Back to School photos are taken, we will use the board as a scrapbook bulletin board.  We will change out the heading on the board seasonally and post pictures of the students.  For example, the board might say "The best part of my summer was..."  The students will bring in a photograph from home that shows their favorite part of the summer.  It will be a great way to build the school community.  You know how much kids love seeing pictures of themselves.  :)  I'll be sure to post some pictures of the scrapbook bulletin board after B2S craziness is over.  
Did you see my post on my friend Linda's amazing Jungle Safari Animal Themed Classroom?  Be sure to check it out for classroom decor ideas & tips.  You've also got a chance to win an amazing classroom decor prize pack!  Yay for free stuff!  
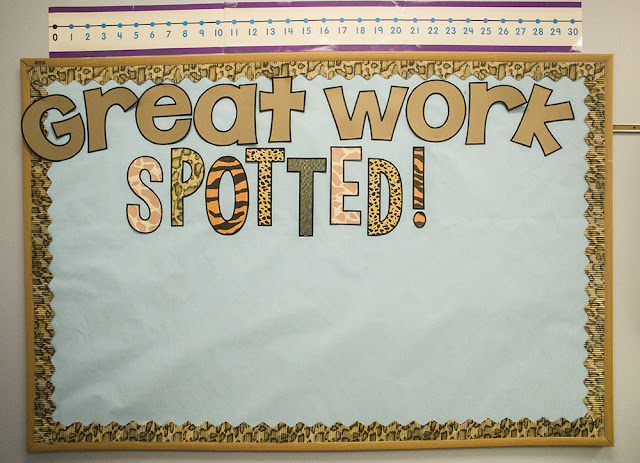
Cute bulletin board to display student work in the classroom.  "Great Work SPOTTED!"
Love this jungle, animal, safari themed classroom!
Here is one more bulletin board I decorated to go with the Jungle/Animal theme!
God is WILD about us jungle safari themed bulletin board.  Add students' names and photos.  Super cute for jungle classroom decor
"God is WILD about us!" 
I cut 4.5" x 4.5" squares of safari print paper as a background for each student's picture.  I found the adorable jungle animals at Michael's, and I wrote each kiddo's name on one with a Sharpie.  
This bulletin board would be adorable if you are in a private school.  It would also be great for Sunday School or Vacation Bible School.

Classroom Decor Ideas and Tips

Decorating a classroom can be hard work when you are a new teacher, moving to a new classroom, or changing your classroom theme.  Let me save you some headaches with a few simple tips & an awesome giveaway to get you started.
1.  Pick a theme or color scheme.  
I had the pleasure of helping my dear friend, Linda, set up her classroom for Back to School.  When she told me her theme was zoo animals/jungle/safari, I was ALL IN because who doesn't love a little cheetah & leopard print?  Choosing a theme or color scheme will help make your classroom warm and inviting.  You want a cohesive look without it looking like Pinterest threw up all over your classroom.  Ha!  
Beautiful, bright jungle/safari classroom decor! Love this classroom theme!
2.  Use Fadeless® paper to cover bulletin boards and doors.  
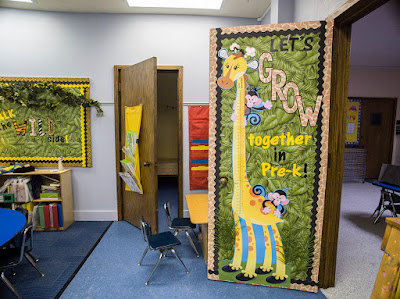
Over the years, I've tried using butcher paper and fabric to cover my bulletin boards, but nothing compares to Fadeless® paper.  Butcher paper wrinkles and fades.  Fabric has to be ironed, and let's be honest, who has time for that?  Look how gorgeous this tropical foliage print looks on the bulletin board and door!  It ties the room together.  
Animal print, safari, jungle themed bulletin board.  Love the bulletin board paper and layered borders!
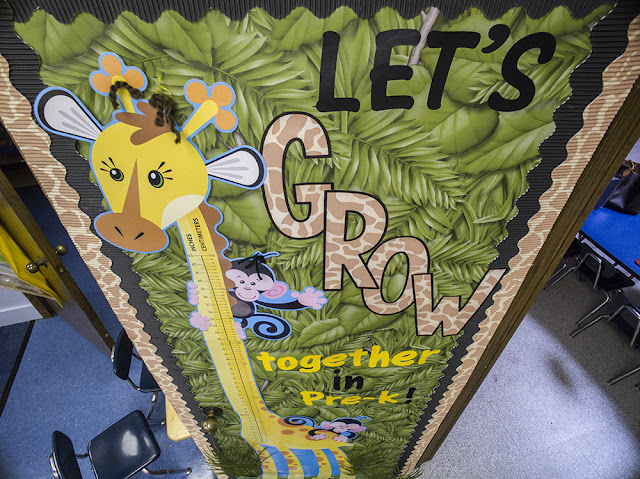
Let's GROW together in Pre-K!  Love this giraffe & animal print decor!
Let's GROW together in Pre-K!  Adorable jungle, zoo animal classroom theme & decor!
3.  Layer your bulletin board borders.
Layering your borders will make your bulletin board POP!  It adds color and contrast, and it is so easy to do.  Thank you, hot glue! 
Use hot glue to perfectly layer your bulletin board borders.
 How gorgeous is this layered border on the tropical foliage Fadeless® paper?  
Hot glue bulletin board borders together before stapling them to your bulletin board.  Layered borders add contrast & POP off your bulletin board.
You can even just pair a solid Bordette® with a fun print like this...
Layer a solid border with a fun printed border to make your bulletin board pop!
Maria from Kinder Craze has an awesome tutorial and video on perfectly layering your bulletin board borders.  Click on her picture below to find out how it's done...
Tutorial from KinderCraze on perfectly layering your bulletin board borders
4.  Make your own bulletin board letters.  
Create your own bulletin board letters by typing one huge letter on each page.  Print each letter on fun paper and cut out. This will add so much excitement to your bulletin boards.
When you figure out what you want your bulletin board to say, pick one main word and make your own letters.  Pick a big, chunky font, and type one letter on each page.  Increase the font so it fills the entire page.  Now it's time to format your text.  You don't want to waste ink by printing a giant black letter.  Instead, change the letter fill to "no fill."  Print each letter on fun paper.  I used Pacon's super fun safari print paper
How to create your own bulletin board letters. 
I would also suggest changing the Text Line.  To do this, choose Format Text.  Click on Text Line on the lefthand side.  Choose Weights & Arrows from the top.  Increase the weight to 15 pt or so.
How to create your own bulletin board letters
When I first made the "WILD" letters, I forgot to change the Text Line, so I reprinted the letters with a thick line.  See the difference... The "W" and "I" have the thick 15 pt. line and the "L" and "D" have no line.  The thick black line makes the letters stand out against the patterned paper.  
How to create your own bulletin board letters that really POP on classroom bulletin baords
For the rest of the letters & words, I used Pacon's self-adhesive letters.  These letters are the bomb because they are removable and repositionable.  I can never get my letters lined up and centered the first time, so I love that you can peel them off and move them around.
5.  Create ambience!
Make your classroom a warm and inviting environment by painting your walls, adding lamps, creating cozy spots, and incorporating plants & greenery.  If your principal allows you to paint, invest the time & money and paint your walls a soft color.  It will make a huge difference, I promise!  If you can't paint, don't fret.  Find curtains, lamps, rugs, & pillows that will make your classroom as cozy as your living room.  
Create a cozy classroom reading nook with IKEA leaf.  Great Work Spotted bulletin board is perfect for displaying student work.
I love how my friend Linda used this IKEA leaf to create a cozy space.
Create a cozy classroom reading nook with IKEA leaf.
Lately, I've been reading articles that say teachers should have bare walls and little to no decor in their classrooms.  I wholeheartedly disagree.  Think about it... You and your students spend 8+ hours a day in the classroom.  You want it to feel like home.  Don't overdo it, but adding a little ambience & decor goes a long way.  
6.  Keep it simple.
You don't need to fill every wall and bulletin board with "stuff."  Keep areas blank at the beginning of the year so you have space to display student work, anchor charts, and pictures of your kiddos.  Take a step back and ask yourself, "Is there too much clutter?"  If so, take a few things down and simplify.
Great Work Spotted bulletin board is perfect for displaying student work.
 Instead of decorating this entire bulletin board, I put up some light blue Fadeless® paper, some animal print Bordette® and "Great Work SPOTTED."  After the craziness of Back to School wears off, it will be easy to add student work to complete this board.  
Keep bulletin board simple!  Just add Fadeless paper, Bordette, & and a cute title.  Later, add student work to complete the bulletin board.
Are you ready to take a walk on the wild side?  If so, enter the Rafflecopter below to win this amazing prize pack from Pacon!  
a Rafflecopter giveaway
Disclosure: TheHappyTeacher & Pacon partnered for the purpose of this post. I received free samples of Pacon products, but all opinions are my own.